
Roles: Can access: Admin · Can edit settings: Admin
Time: about 20 minutes · You'll need: a computer with a web browser, plus a phone or tablet
Introduction
This guide takes you through a full Soarvo workflow, start to finish. You'll set up a project in the portal, design a simple data-capture form, record a feature in the field with the mobile app, and then review and export the results back in the portal.
By the end you'll have:
- ✅ A project with one location
- ✅ A feature type (a form) called Tree, with four attributes
- ✅ One tree recorded on your phone, with a photo
- ✅ An Excel (XLSX) or HTML export of your data
💡 Tip: This guide uses an Admin account the whole way through, so you won't run into permission limits. When you've finished, see User roles explained to decide what your team members need.
The journey at a glance
| # | Where | What you'll do |
|---|---|---|
| 1 | 💻 Portal | Log in as an Admin |
| 2 | 💻 Portal | Create a new project and its first location |
| 3 | 💻 Portal | Add a new feature type |
| 4 | 💻 Portal | Add attributes (the form fields) |
| 5 | 📱 Mobile | Download the app and log in |
| 6 | 📱 Mobile | Refresh the location list and open your location |
| 7 | 📱 Mobile | Record a new feature |
| 8 | 💻 Portal | Review what was captured |
| 9 | 💻 Portal | Export to XLSX or HTML |
Part 1: Set up in the portal
Step 1: Log in as an Admin
- Go to live.soarvo.com and log in with your Admin email and password.
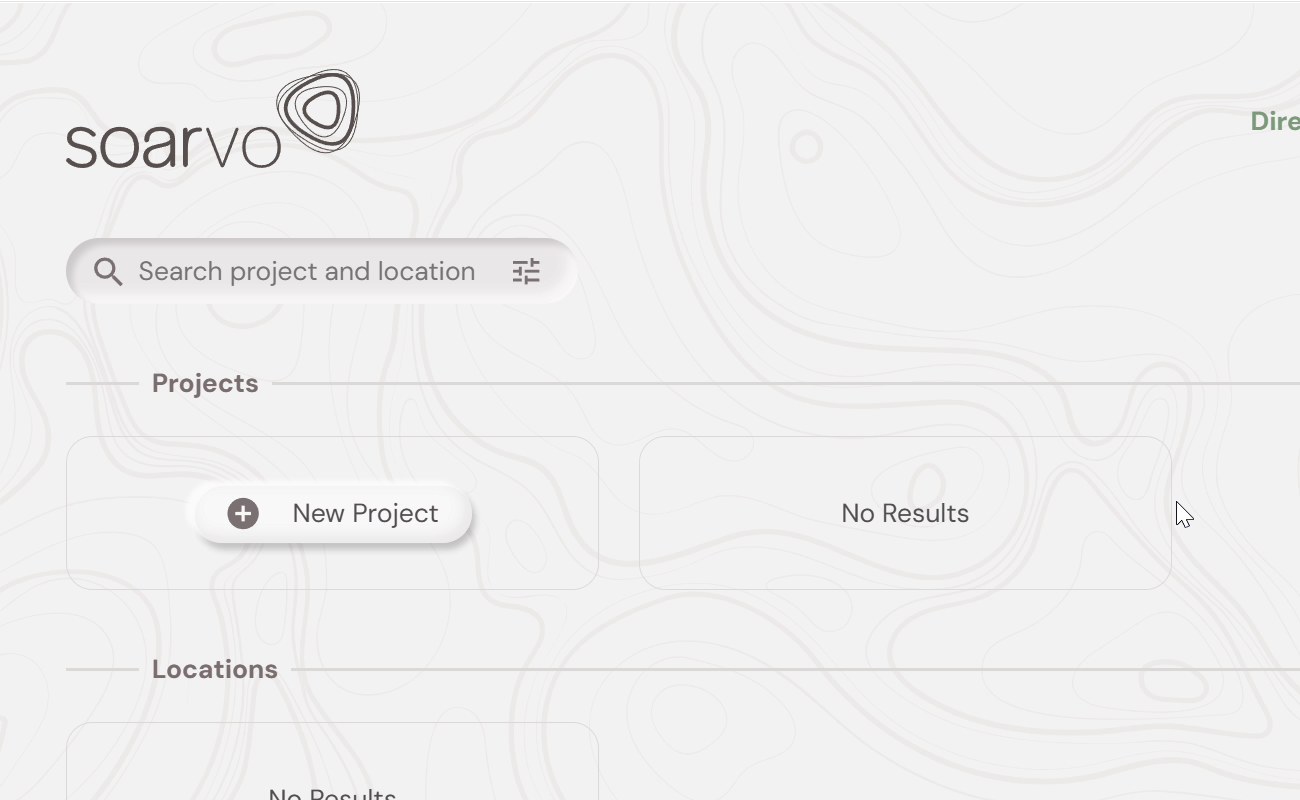
- The home screen opens and shows your Projects and Locations. On a new account, both lists say No Results.
📖 Trouble logging in? See Logging in for the first time.
Step 2: Create a new project and its first location
- Under Projects, click + New Project. The Project Setup screen opens.
- Under Project Details, fill in these fields:
Field What to enter Example Project name A clear name for the site or contract My First ProjectProject categories The type of work GeneralCoordinate system Your national grid (see the note below) 27700or2157Measurement system Metric, Imperial or Imperial US Metric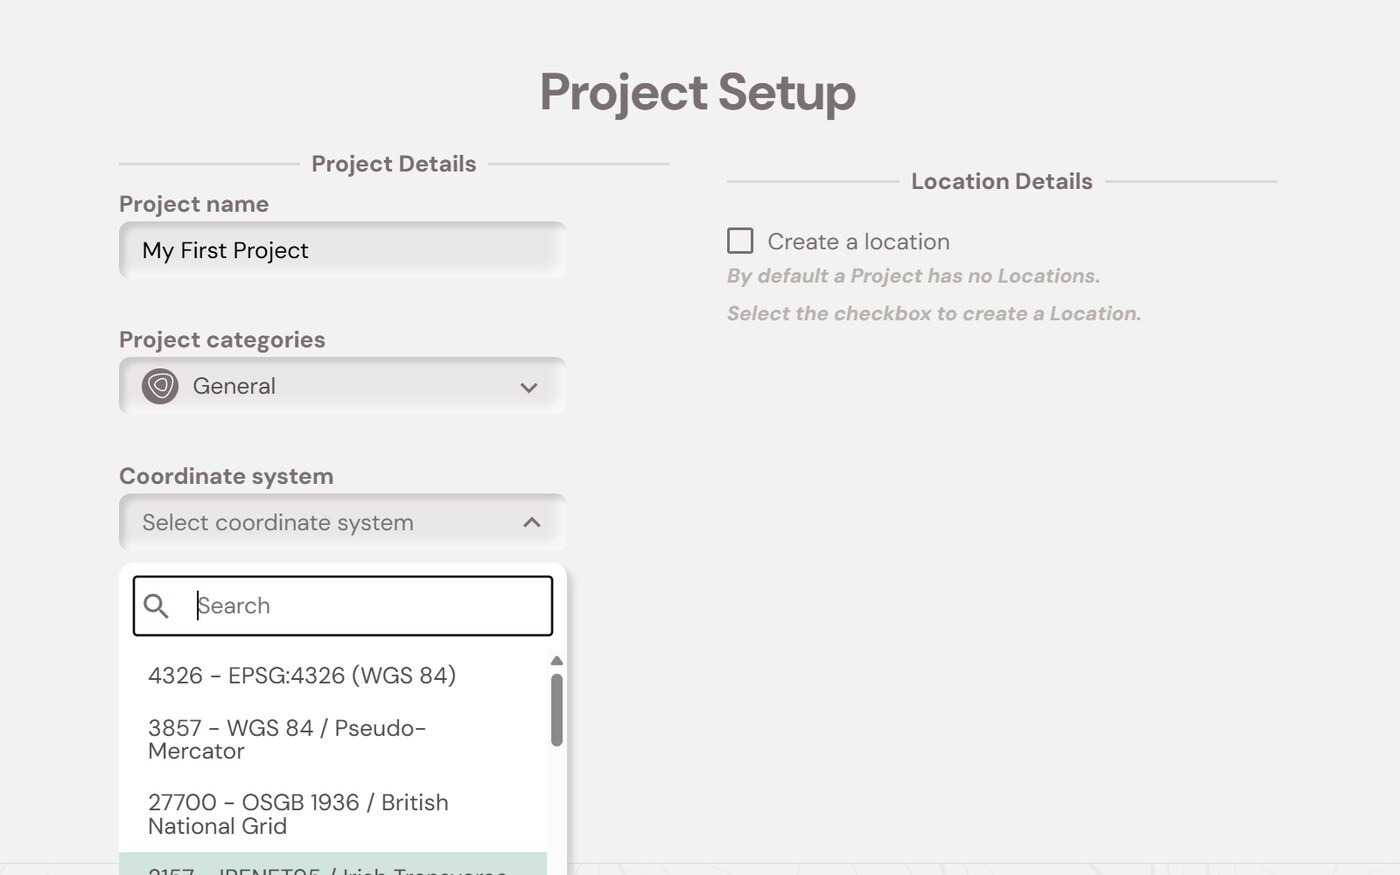
📍 Which coordinate system? Type the code into the search box to find it quickly:
- United Kingdom:
27700 – OSGB 1936 / British National Grid - Ireland:
2157 – IRENET95 / Irish Transverse Mercator
- United Kingdom:
- Under Location Details, tick Create a location. (By default, a project has no locations.)
- Enter a Location name, for example
Test Location. - Next to Co-ordinates, click the map icon. A map opens.
- Type a postcode or address into the search box, for example
WA10 4GX, and press Enter. Then click the exact spot on the map.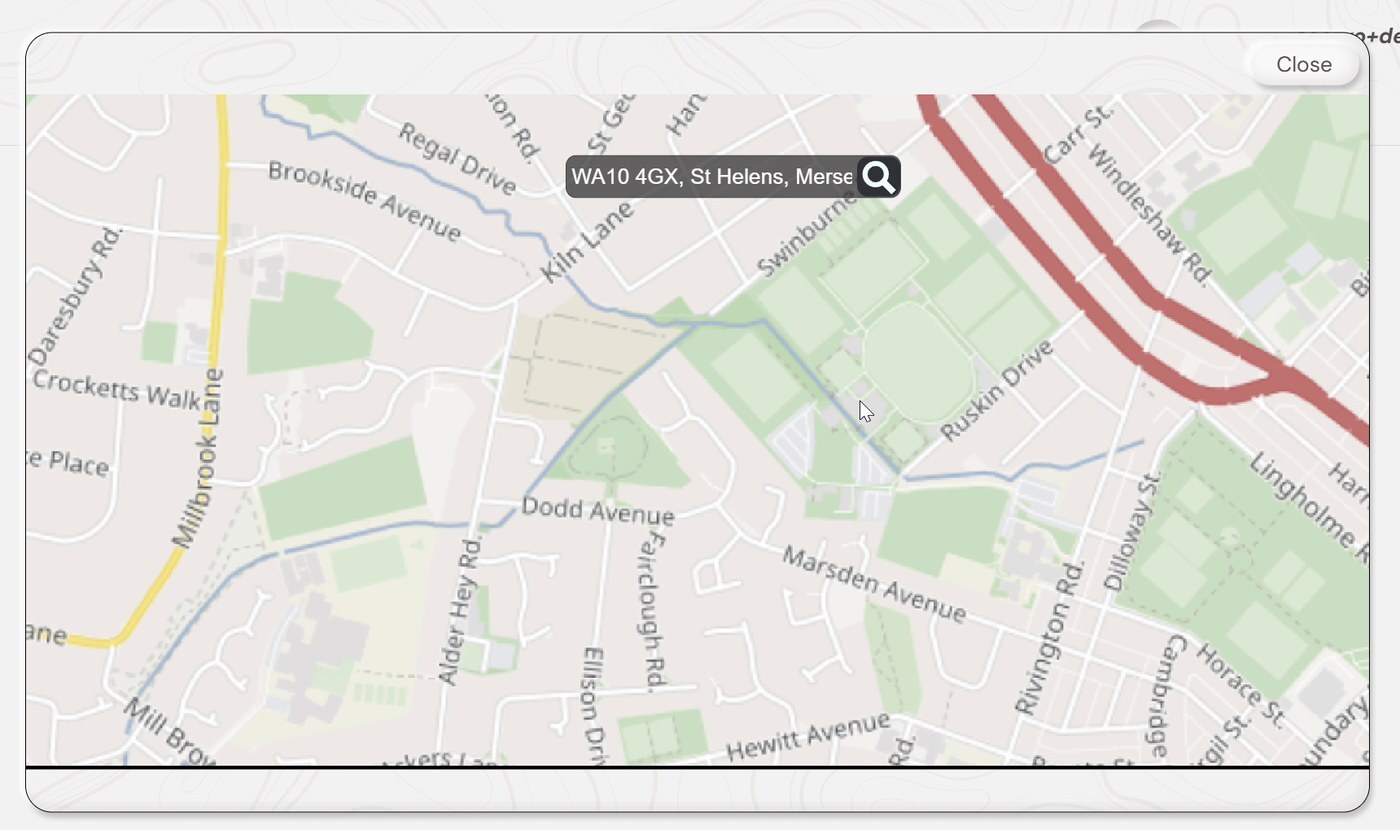
- Latitude and Longitude fill in automatically. Check that the values look right.
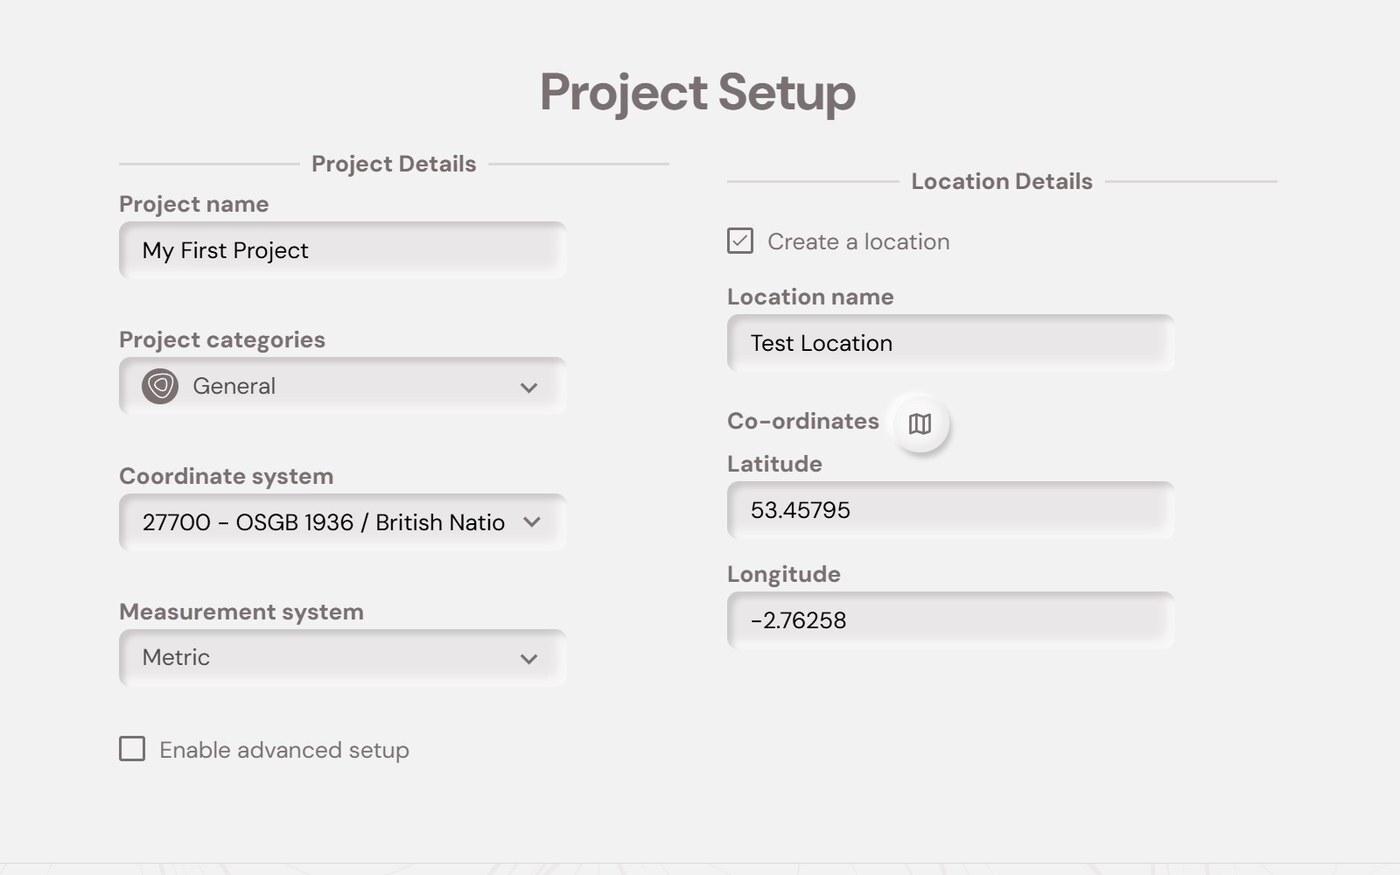
- Click Go to Project (bottom-right).
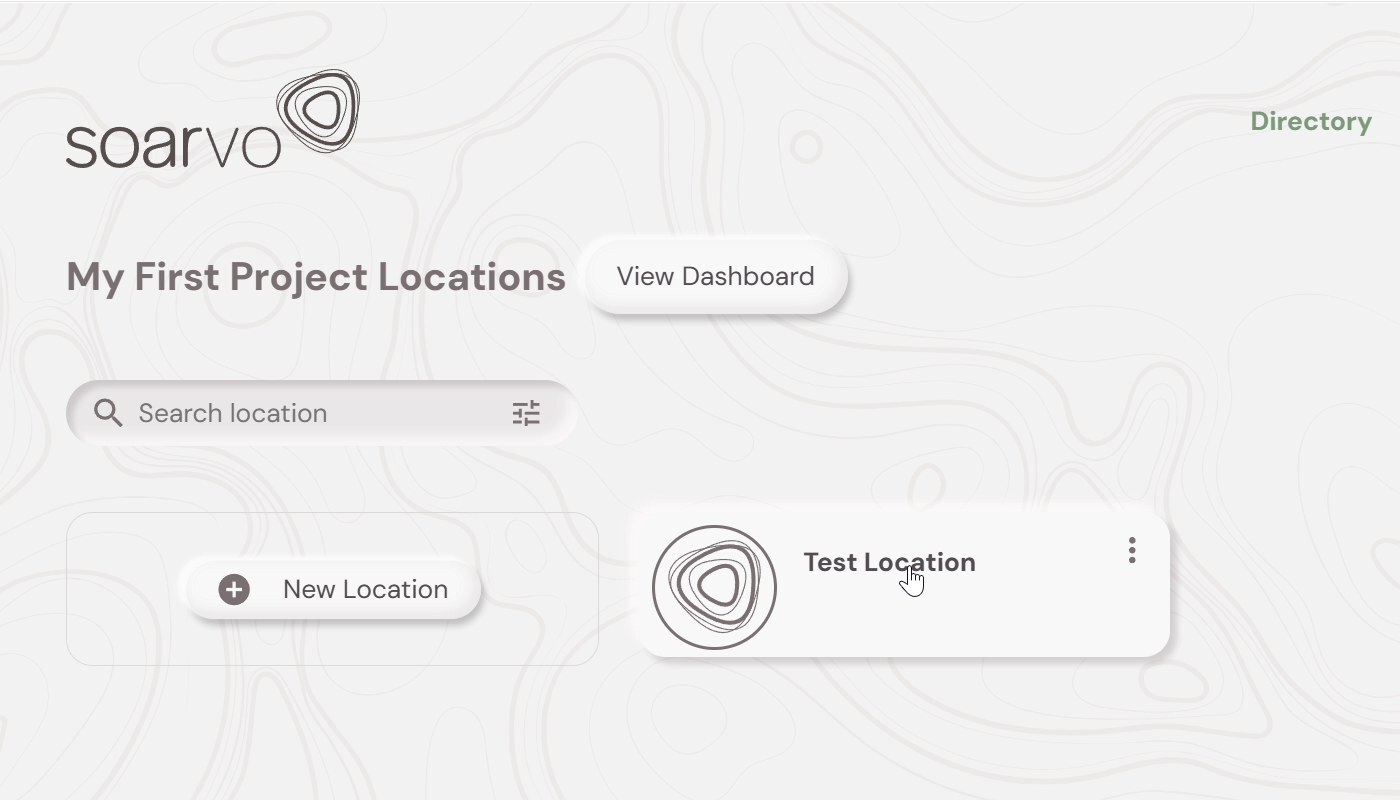
What you should see: The project's location list opens (for example, My First Project Locations), with your new location shown as a card.
⚠️ Note: Leave Enable advanced setup unticked for your first project. The defaults are fine for this walkthrough.
Step 3: Add a new feature type
A feature type is a template for the things you record in the field, such as trees, manholes or defects. It sets how each feature looks on the map and which form fields (attributes) get filled in.
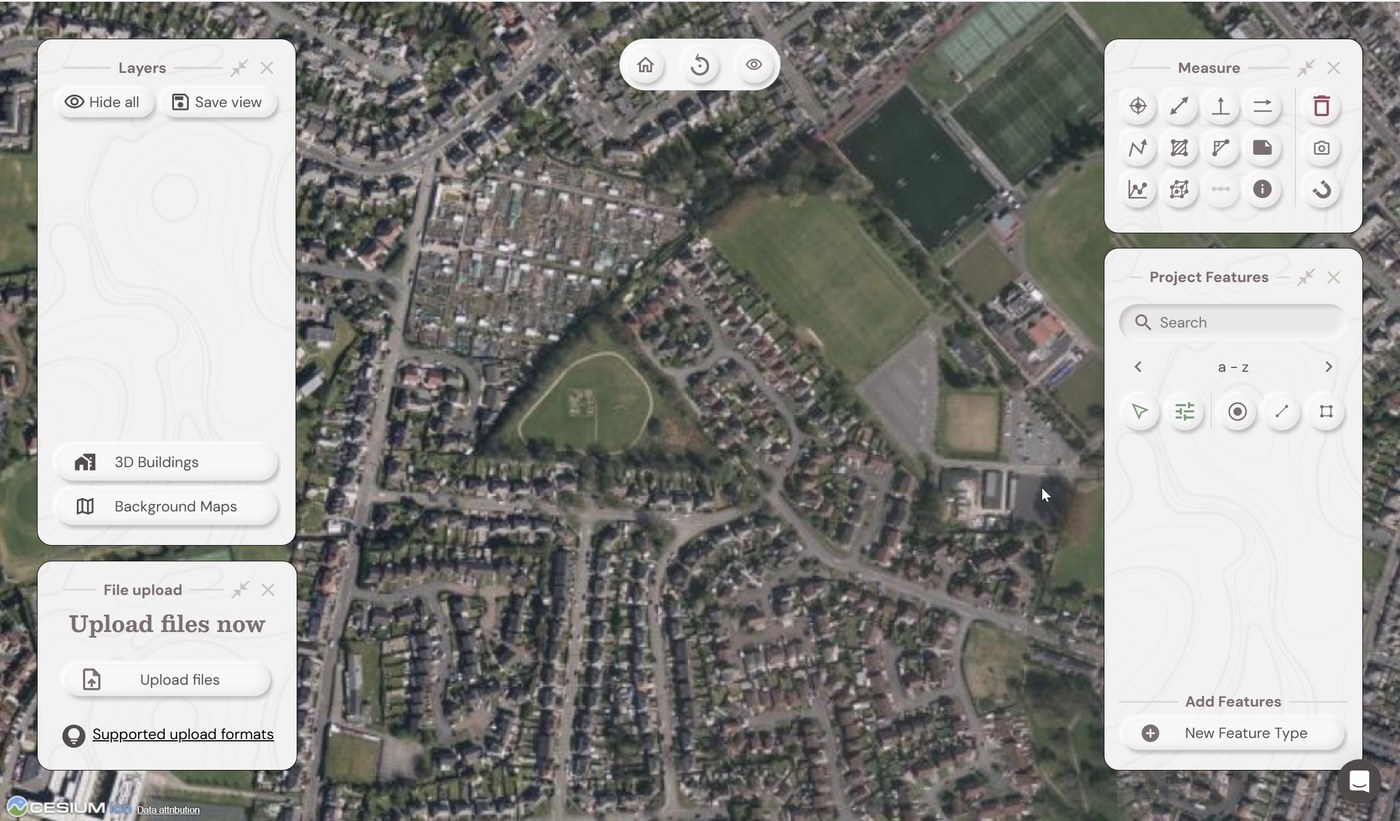
- Click your location card (Test Location) to open it in the map.
- Find the Project Features panel on the right. At the bottom, under Add Features, click + New Feature Type.
- In Name, enter
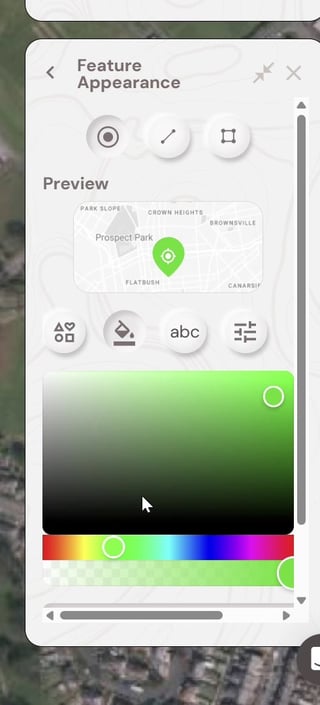
Tree. You can add a Description if you like. - (Optional) Click the palette icon next to the name (Geometry Type and Styling) to open Feature Appearance. Here you can:
- pick the geometry: point, line or polygon (a tree is a point)
- choose an icon and a colour
- check the result in the Preview
- Step 4: Add attributes to the feature type
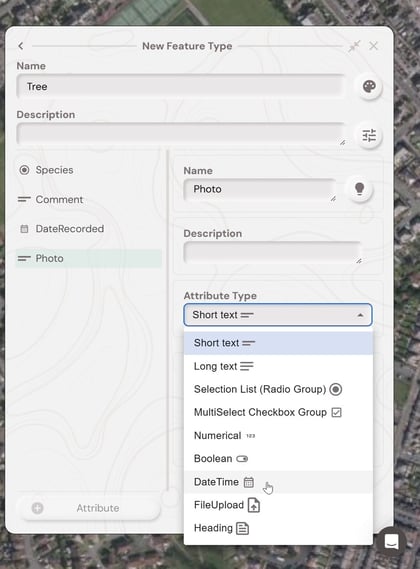
Attributes are the fields your field team fills in when they record a feature. Each one has a Name, an optional Description, an Attribute Type and some Attribute Settings.
To add each attribute:
- Click + Attribute at the bottom of the panel.
- Enter the attribute Name.
- Choose the Attribute Type from the list.
- Complete the Attribute Settings (see the table below).
- Tick Input is mandatory if the field must always be filled in.
Recommended starter attributes
These four attributes make a good first form. They cover a choice list, free text, an automatic date and a photo.
| Name | Attribute Type | Attribute Settings | Why it's useful |
|---|---|---|---|
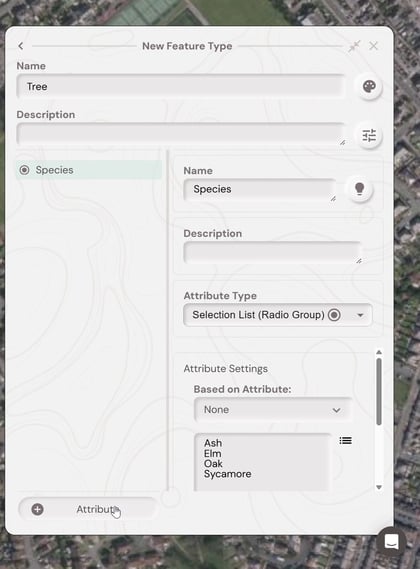
Species |
Selection List (Radio Group) | Enter one option per line: Ash, Elm, Oak, Sycamore |
Gives quick, consistent answers in the field with no typing needed |
Comment |
Short text | Leave Default Text empty | Lets field users add free-text notes, for example needs cutting |
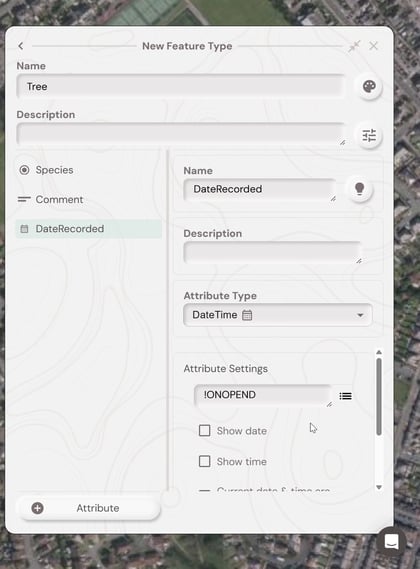
DateRecorded |
DateTime | Click the menu icon (≡) next to Default Text and choose Date Updated. The field shows !ONOPEND. |
Stamps the date automatically, so the field user doesn't have to enter it |
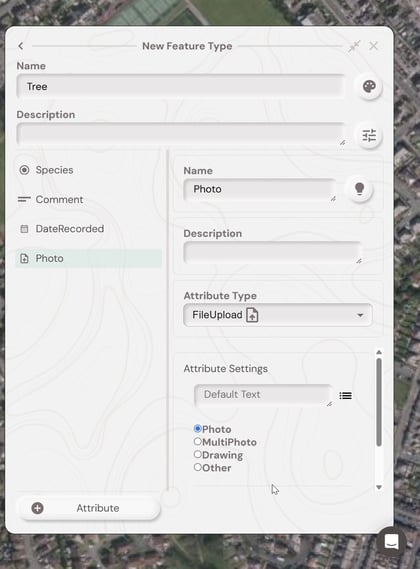
Photo |
FileUpload | Select Photo (other options: MultiPhoto, Drawing, Other) | Lets field users take or attach a photo of the feature |
Species: Selection List (Radio Group)
DateRecorded: DateTime with an automatic date
💡 Tip: The ≡ menu on Attribute Settings has other handy options: Time Updated, Date/Time Updated, Repeat Last (reuses the previous answer), Conditional Visibility, Readonly and Hidden.
Photo: FileUpload set to Photo
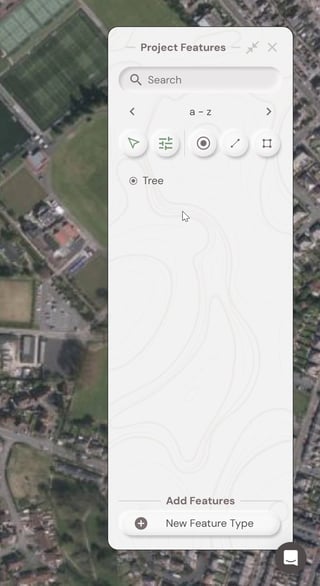
When all four attributes are in place, click the back arrow (‹) at the top of the panel.
What you should see: Tree now appears in the Project Features list.
💡 Tip: You can drag the attributes in the list on the left to change the order they appear in on the mobile form.
Part 2: Capture data in the field
Step 5: Download the mobile app and log in
- Scan the QR code below with your phone's camera, or search for Soarvo in the App Store (iOS) or Google Play (Android).
📲 [QR CODE: insert the Soarvo Mobile app download QR code here]
- Open the app and allow the Location and Camera permissions when asked.
- On the Login tab, enter the same Admin email and password you use for the portal, then tap LOGIN.
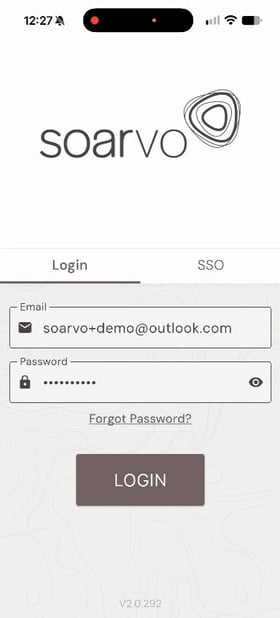
💡 Tip: If your organisation uses Microsoft single sign-on, use the SSO tab instead.
Step 6: Refresh the location list and open your location
- The Home screen opens. If it says No locations found, swipe down on the list to refresh it.
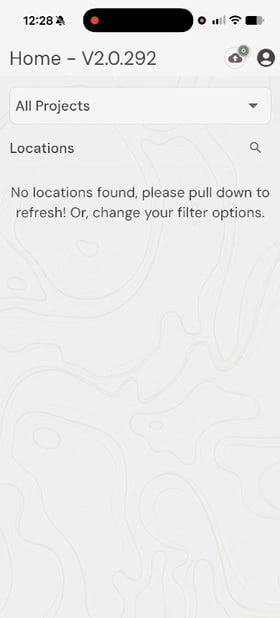
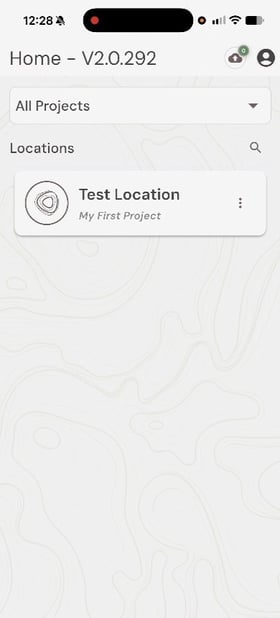
- Your location (Test Location, in My First Project) appears. Tap it to open it.
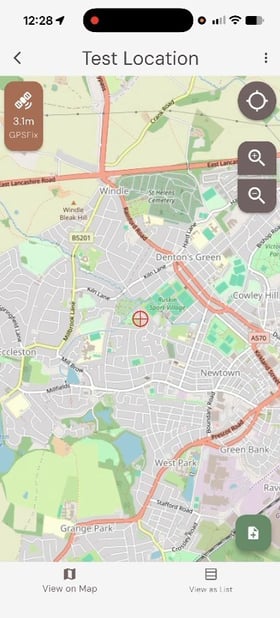
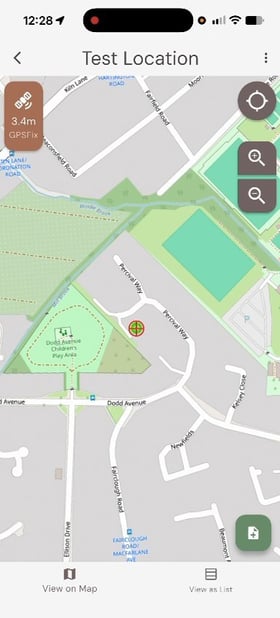
- The map opens and centres on your location. The badge in the top-left corner shows your current GPS accuracy
Step 7: Record a new feature
- Tap the green + (Record new feature) button in the bottom-right corner of the map.
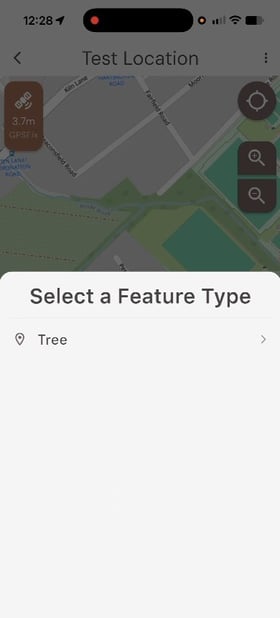
- Under Select a Feature Type, tap Tree.
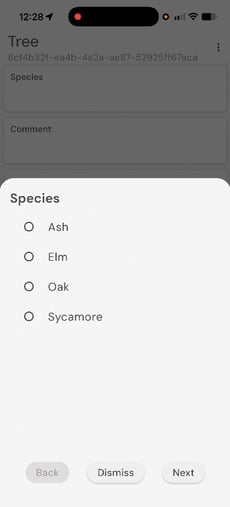
- The Tree form opens with the four attributes you created. Tap each field to fill it in:
- Species: choose an option, for example Ash, then tap Next.
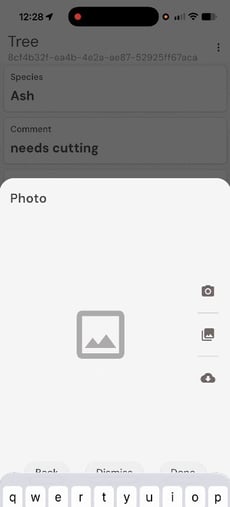
- Comment: type a note, for example needs cutting, then tap Next.
- Photo: tap the camera icon to take a photo (or the gallery icon to choose an existing one), tap Use Photo, then tap Done.
- DateRecorded: leave this blank. It fills in automatically when you save.
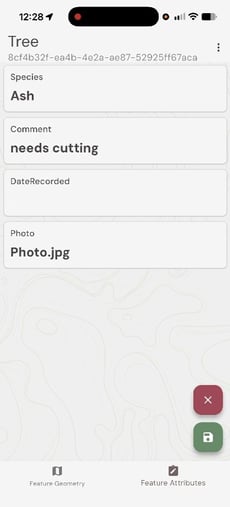
- Tap the green Save button (bottom-right). To discard the feature, tap the red ✕ instead.
What you should see: You're taken back to the map, and your new tree appears as a point.
⚠️ Note: Your data reaches the portal once your device has a connection. Working without signal? See Mobile app basics.
Part 3: Review and export in the portal
Step 8: Review the captured data
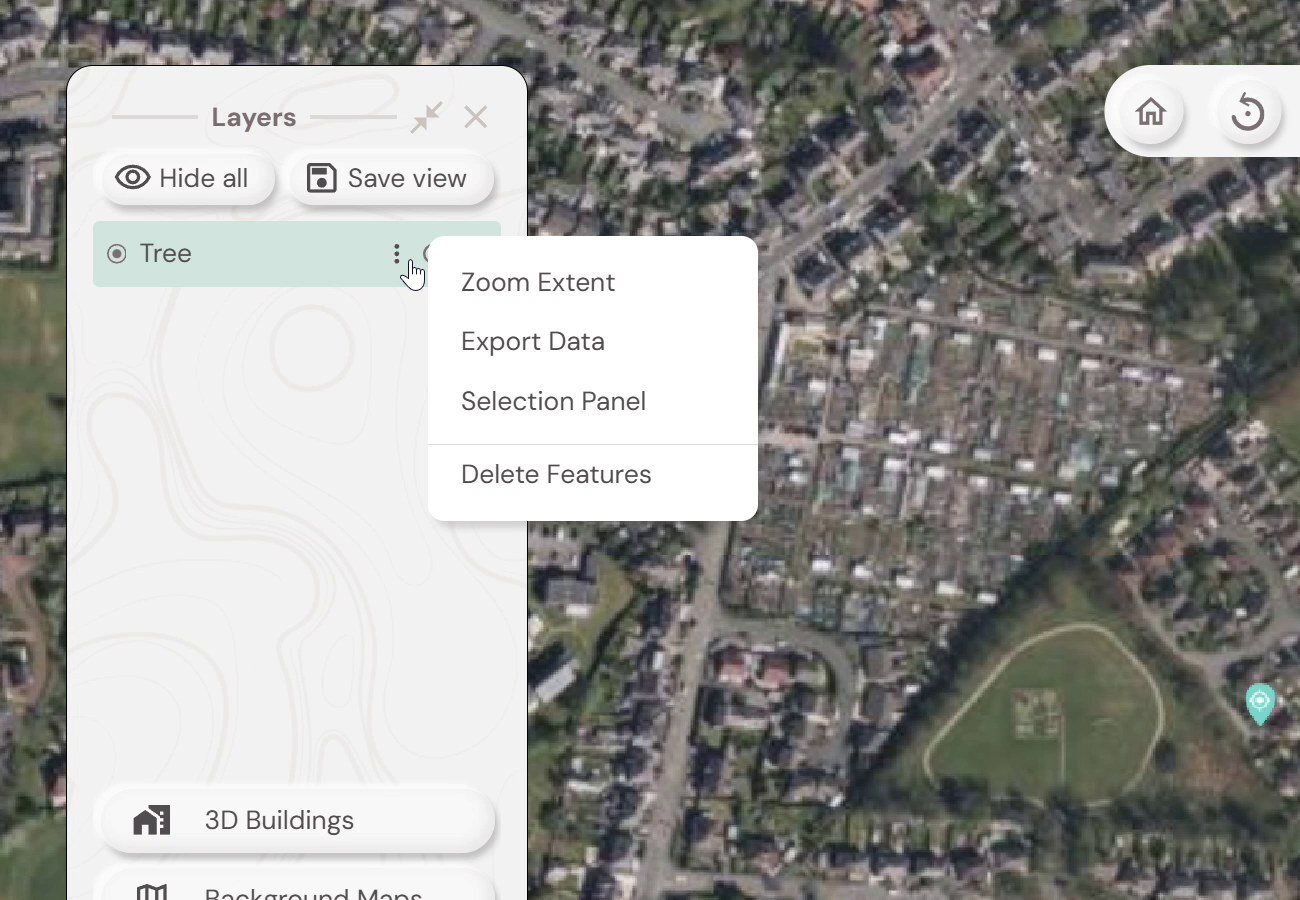
- Back in the portal, open Test Location. A Tree layer now appears in the Layers panel, and your feature shows on the map.
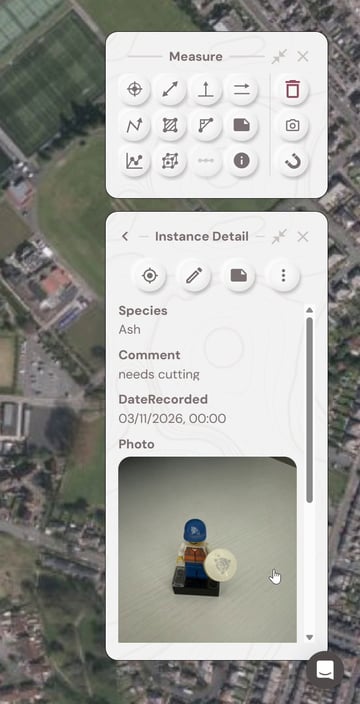
- Click the feature on the map. The Instance Detail panel opens with everything captured in the field: Species, Comment, the automatic DateRecorded and the Photo.
Step 9: Export to Excel (XLSX) or HTML
- In the Layers panel, click the ⋮ menu next to Tree and select Export Data.
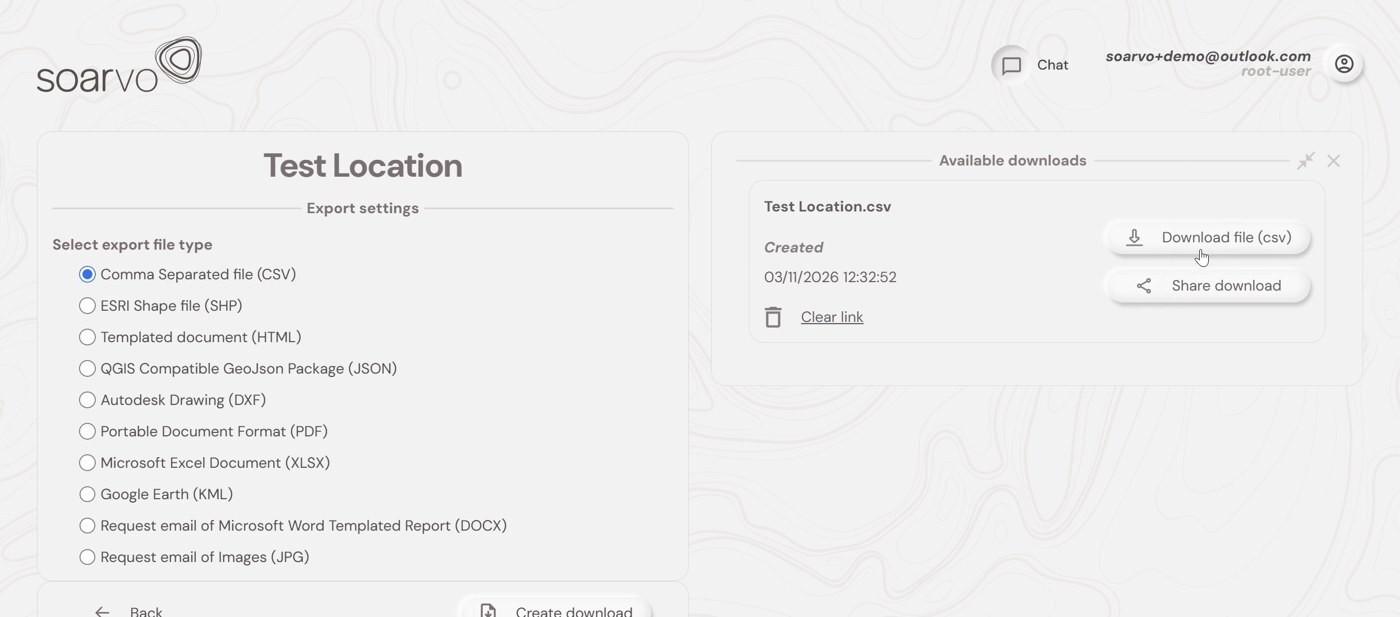
- Under Select export file type, choose a format:
- Microsoft Excel Document (XLSX): a spreadsheet with one row per feature
- Templated document (HTML): a formatted report you can open in any browser
- Click Create download.
- Your file appears under Available downloads. Click Download file to save it, or Share download to get a link you can send.
💡 Other formats: You can also export to CSV, ESRI Shapefile (SHP), QGIS-compatible GeoJSON, AutoCAD Drawing (DXF), PDF and Google Earth (KML). You can also request an emailed Word templated report (DOCX) or the images (JPG).
Expected outcome
🎉 You've completed the full Soarvo workflow. You've:
- created a project and location in the right coordinate system
- designed a reusable Tree form
- captured a feature with a photo in the field
- reviewed it in the portal and exported it
Common iss
What's next?
Now that you've run through the whole workflow, you might want to:
- 👉 Inviting users to Soarvo: bring your field team in, so they can capture data using their own logins.
- 👉 Sharing projects and locations: give your team access to My First Project.
- 👉 Required fields and validation: make your forms more reliable with mandatory fields and conditional visibility.